Log video to RAW DNG for lightroom

Rant
Recently, I got a bit lazy and switched from taking RAW photos to shooting videos. Modern cameras can capture full-sensor 6K video in 12-bit log, providing incredible dynamic range, color gamut, and raw-like capabilities. The files allow me to select the perfect frame with the right expression or focus, almost like the live photos on our phones :-). Grading log footage in Davinci Resolve in the wide gamut ACES is amazing.
However, integrating this into a typical photography workflow is a bit challenging. Lightroom is our go-to for not just grading and processing photos but also for maintaining a searchable library and for online uploads. Exporting selected frames as JPGs to Lightroom seems to work, but it has its drawbacks. The main strength of Lightroom lies in its non-destructive workflow, allowing edits even on photos taken years ago. This flexibility is lost when using JPGs exported from Davinci, as the look is already baked into them.
Additionally, I noticed that I tend to grade my photos differently than my videos. Once the frames are in Lightroom, I often find myself tweaking them further, layering one grade on top of the baked one within the limited dynamic range of SDR JPGs. This process bothered me. I wasn’t happy that the transition from one app to another resulted in a loss of wide gamut and high dynamic range. Surely, there must be a better way, right? Well, not right out of the box.
Application limitations
Davinci Resolve
- export of stills is limited to a few basic formats (jpg, png, tiff, exr etc)
- no control over the format settings
Lightroom Classic
- doesn’t understand any log colour spaces,
- cannot load hdri, exr, floating point tiffs or any high dynamic photo formats
- the input is limited to SDR formats and RAW.
So we have two really good pieces of software, one for video and one for photography without exchange format that would preserve the data that was captured. In 2024! How did we end up here? No exr support in lightroom? Even no real colour space support, besides a few basic ones from 80-ties. Come on Adobe! So I decided to dig in spend some nerdy nights looking for a better way.
The plan
- export data from resolve in a format that preserves all the data that the camera captured.
- use a custom magic solution to convert it to a format that lightroom can load.
- import to lightroom and grade there.
steps 1 and 2 are relatively simple.
1. We can export high-quality 16-bit TIFFs from Resolve that preserve all the data. Let’s, for the moment, overlook the fact that these files are quite large, much larger than RAW photos from the same camera. The crucial point here is that we can extract all the data, including wide gamut and HDR.
To begin, I set my Resolve timeline to ACEScc and exported ungraded (but properly color-managed) images as TIFFs. The color space of the files is now ACEScc, which is logarithmic with a wide color gamut. However, these files are not correctly tagged, causing them to load improperly in any application. They appear washed out. Nevertheless, they retain all the data and encode it in the 0-1 range (to be precise, 0-255) which can be saved in the tiff files. Not a big deal to get the data out of resolve.
3. Now, the challenge is to transfer this data to Lightroom. It appears that the only format compatible with Lightroom that supports high dynamic range is DNG, aside from proprietary raw formats. The DNG format was originally designed to store RAW photos, typically from Bayer sensors, representing just grey values. However, it is versatile enough to handle debayered data, even in floating-point values and any desired color gamut (as raw data is usually stored in the native camera sensor color space, which varies for each camera). Additionally, DNG is an open-source format with abundant online documentation.
Lets see if we can write a converter in python that will convert data from our tiffs to DNG.
Solution
DNG is an extension of the TIFF format, which is well-documented. Unfortunately, there are no Python packages capable of effectively reading and writing DNG files. While there are some with limited capabilities, none of them serves the specific purpose required. It’s quite surprising that there are no official Python bindings for the DNG SDK. Adobe does provide a C++ SDK that appears promising, but I hesitated to attempt compiling it with OCIO libraries and handling the associated complexities. So what do we do? We need another plan:
- load 16bit tiffs into python
- linearise and convert to a chosen colour space to save to DNG
- write a DNG file with our linear data in a way that lightroom can load correctly
Again two steps out of the 3 are relatively easy.
Using OpenCV library we can load the images very easily. There is a gotcha here that gave me a few sleepless nights. OpenCV defaults to BGR order of channels and that plays havoc with colour matrices and the channels have to be swapped to RGB.
img = cv2.imread(path)
img = cv2.cvtColor(img, cv2.COLOR_BGR2RGB)
step one sorted :-)
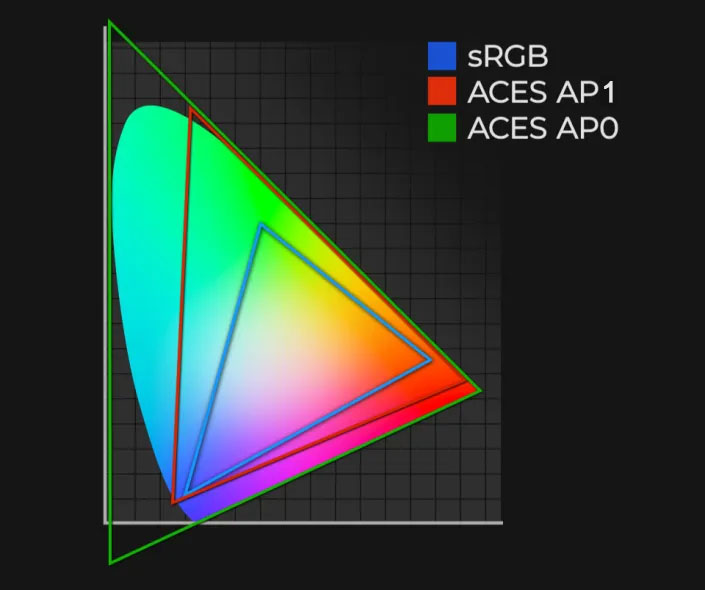
next we need to convert the data to a linear colour space as lightroom doesn’t support logarithmic ones. We only used the log to get the data out from davinci and preserve the dynamic range. To convert the image we can use PyOpenColorIO library. I decided to use ACES2065-1 colour space in my custom DNG files as this is industry standard. I had to pick something with a wide gamut as ACES seemed like a logical choice.
colour conversion is also quite simple:
config = getOcioConfig()
in_colour = config.getColorSpace(TIMELINE_COLOUR_SPACE)
out_colour = config.getColorSpace(DNG_COLOUR_SPACE)
processor = config.getProcessor(in_colour, out_colour)
cpu = processor.getDefaultCPUProcessor()
img = img.astype(np.float32) / 255.0	 # watch ot for this one here
cpu.applyRGB(img)
with color spaces being:
TIMELINE_COLOUR_SPACE = 'ACES - ACEScc'
DNG_COLOUR_SPACE = 'ACES - ACES2065-1'
there is a gotcha here again. applyRGB expects float values in 0-1 range while our pixel values are integers 0-255 so we need to convert before we colour convert it.
At this point we have linear floating point data in a large colour gamut. Exactly what we need to dump to a DNG file. Writing DNG files is not trivial and I will skip the detail here as this blog is mostly about colour and pictures :-). To get the colour fully working the last missing piece of the puzzle is the conversion matrix that tells DNG how to convert our ACES data to something that is expected by the apps (photoshop, lightroom, etc). We do not know what colour space is used internally by Adobe products and luckily it doesn’t matter as there is a common way to handle the conversions. Since there are very many different colour spaces it would be hard to define the conversion between all of them. Instead we only need to provide one conversion for each space to one that can store all colours humans can perceive – CIE XYZ. The conversion matrices are reversible and this is enough to convert between any two colour spaces. DNG reader can use our matrix to convert pixel data to XYZ and from there convert it to whatever space it needs. No data is lost as we go through the largest gamut possible.
Since we are using well established colour space we can get the required matrix from ACES gihub pages or the wikipedia
One thing that may not be immediately apparent is that the matrix in DNG is the opposite of what one would expect; it represents the transformation from CIE XYZ to the camera space. In our case, we require a matrix that converts AP0 (ACES2065-1) to CIE XYZ.
DNG_MATRIX = [[1.0498110175, 0.0000000000, -0.0000974845],
              [-0.4959030231, 1.3733130458, 0.0982400361],
              [0.0000000000, 0.0000000000, 0.9912520182]]
There is also this fantastic colour science website where you can generate any conversion matrix you need.
I do realise that I extracted the data from resolve using a smaller colour gamut (AP1 of ACEScc) and then converted it to a wider AP0 to store in the DNG but for this purpose I do not think it matters. Both gamuts are large and possibly larger than the camera native ones anyway.
The colour spaces picked here can be freely changed. For instance we could store CIE XYZ values in our DNG and provide an identity matrix. Or we could store ACEScg with AP1 gamut to keep the same one as the exported one from resolve.
If you are interested my python code is available on github: https://github.com/p0las/dng_creator
And full exploration of DNG creation is on my python blog here: https://python.polas.net/how-to-create-dng-files-from-scratch/
Final thoughts
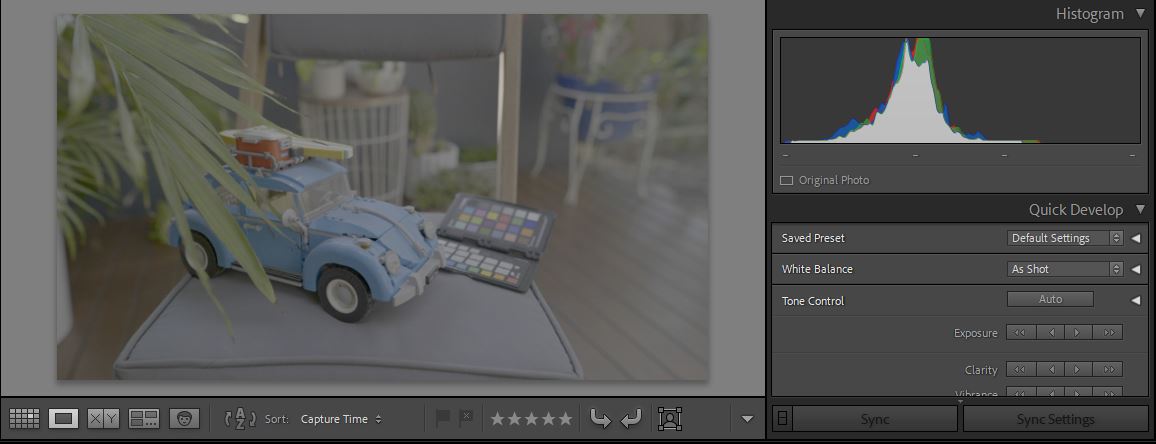
lets compare what our results look like next to native resolve and lightroom processing. I shot something a bit more challenging with the main subject in shade and against a bright background.
On the left we have our DNG and on the right native Resolve rendering of panasonic V-log on sRGB timeline exported as sRGB tiff.
All jpgs exported from lightroom.
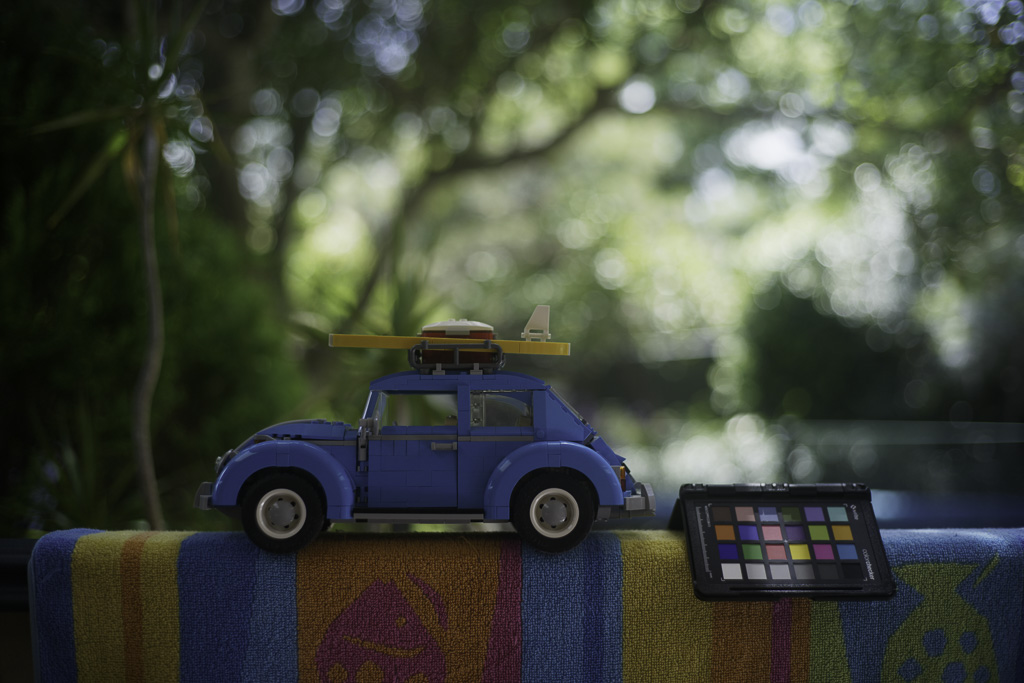
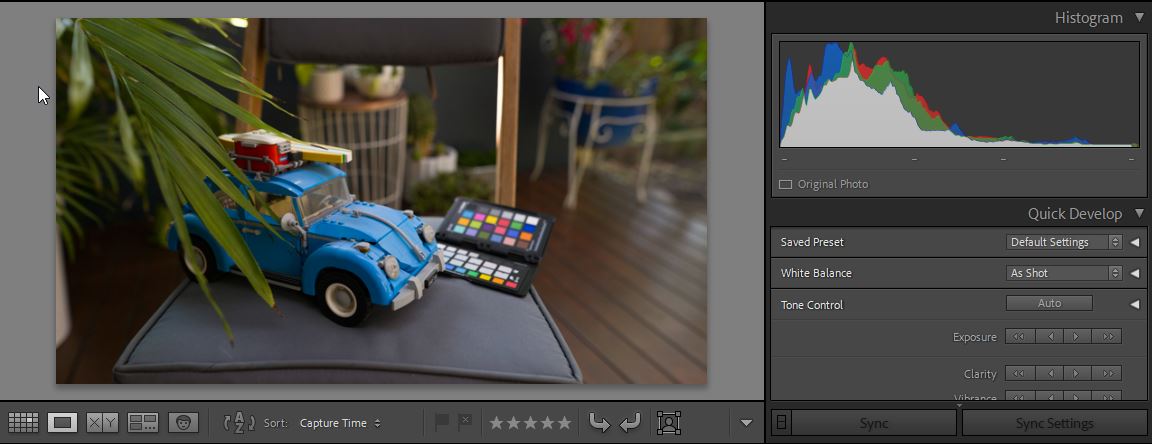
not bad. there is a slight difference but this can be explained. next lets compare our DNG to a RAW file straight from the camera. Left, as before is our DNG, right is panasonic RAW.
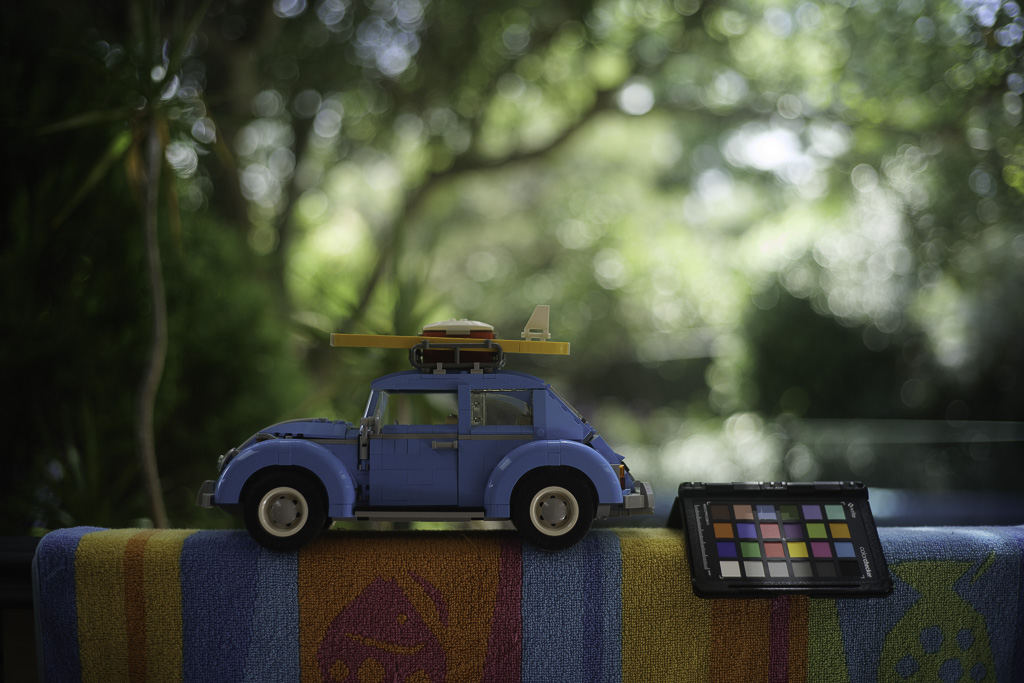
here we can see more differences. black levels are clearly slightly different as well as some colours. Is the maths in the converter flawed? This could be one explanation but I think it is pretty solid.
the camera settings were identical between video and stills. However we see very big difference between how Davinci Resolve converts the data to sRGB to Adobe. Our DNG is somewhere in between. Here is the direct comparativom between resolve (log footage) and lightroom (camera raw) rendering of the same scene:
We have a few things in play here. In resolve we have specific ACES rendering. In lightroom we have camera profiles that are applied to photos. Our DNG has no camera manufacturer set in the metadata and lightroom defaults to its standard profile where the test RAW file is properly tagged and we have a choice between adobe and camera profiles, each giving us a totally different look.
Unexpected benefits
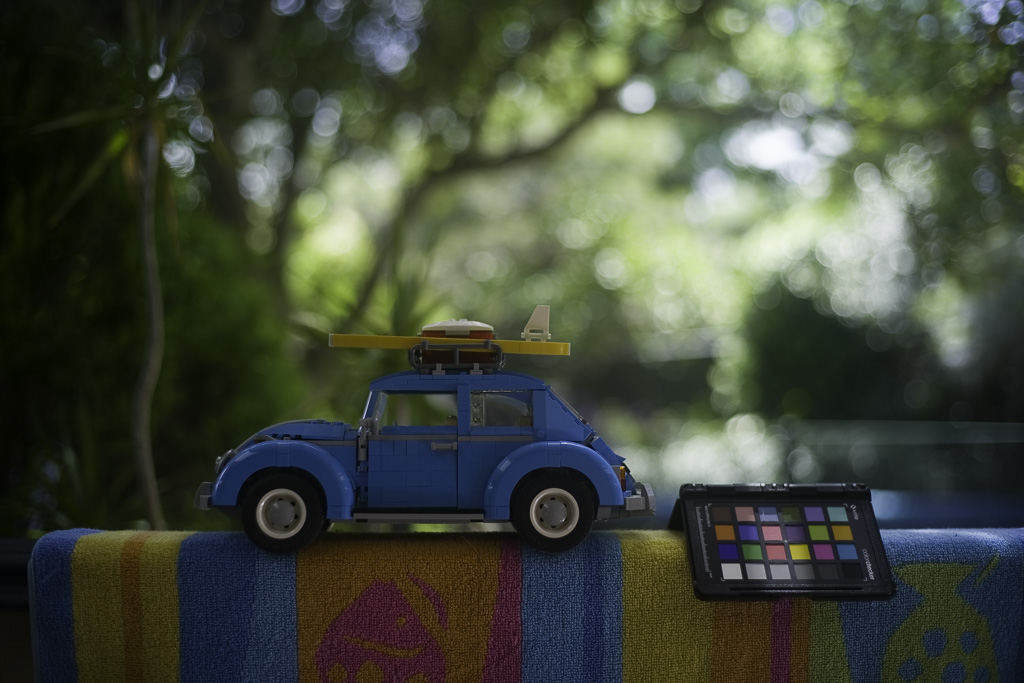
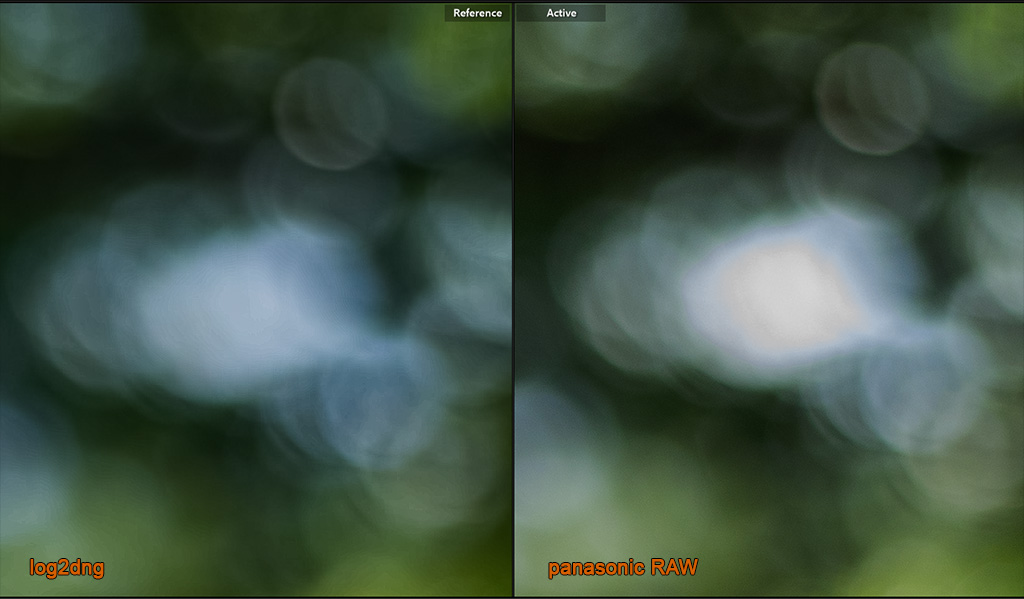
One very surprising side effect is that it seems that the log footage has MORE dynamic range than the raw photo. This is hard to explain as all camera settings were exactly the same. I expected it to be the other way around. The above photo has clipped highlights when I lower the exposure in lightroom while log2dng converted file preserved the bluish sky visible in the bokeh. I noticed it in my other tests too but always blamed my process or maybe changing conditions. This test was on a tripod and I made sure there was less then a second between takes.
This is 1:1 crop of the highlights 3 stops down:
commandline tool (windows only)
download
log2dng_0.9.2.zip (417 downloads )SHA: 3e31c2c86f5fdf508b3a78c7a29fb2fc7e11ca06421d0bc5d51f06523a170a94
usage
the most basic usage, assuming your source tiff/png file is ACEScc:
log2dng.exe -i my_log_tiff.tiff -o output.dngyou can even skip the output file and on the commandline and it will make a dng file in the same folder as the source.
donate?
if you find the tool/code useful feel free to buy me a coffee or lunch :-)